


The Heart of Dub: Filter Sweeps & Movement
How to Craft Classic King Tubby-Style Filter FX Using Plugins and Knobs

One of the key pieces of equipment used in dub is the filter, where sound gets frequency of a particular instrument or song has that frequency squashed, expanded and manipulated to create a distinctive effect that lends itself perfectly to this genre.
On King Tubby Meets Rockers Uptown you’ll here the use of a filter on the hihat throughout the album and provides a great example of how it can be used.
Today, we have the option of outboard filters or plugins. To me the hands-on filter provides a greater ability for spontaneity and unique interaction. With a controller you can create similar results utilizing a rotary knob and the “write” function to record your movements within Midi.
Below you’ll find a brief history, types of equipment these two masters used, pluggin suggestions and How To’s for creating Dub Filters in Ableton, Reaper and Logic.
BRIEF HISTORY
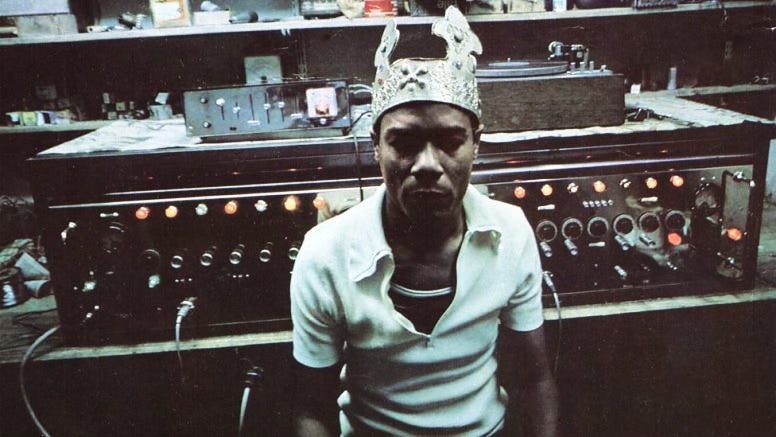
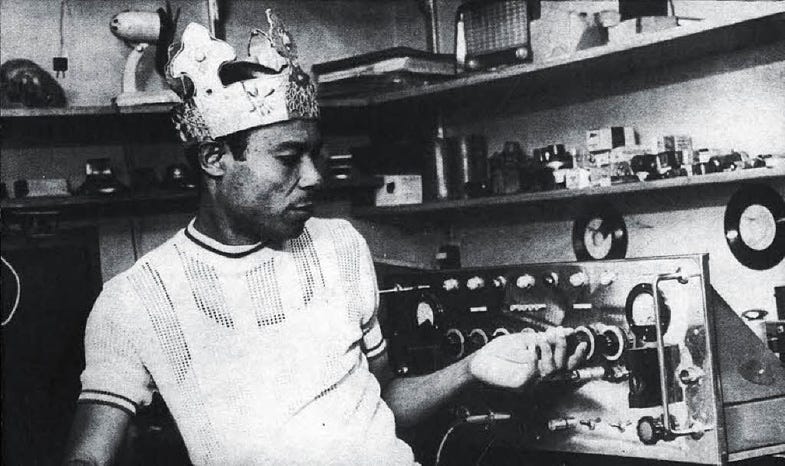
Filters have been a cornerstone of dub reggae since the late 1960s and early 70s. While filters existed in recording consoles and early synthesizers, it was King Tubby and Lee "Scratch" Perry who took this studio tool and turned it into a musical instrument.
King Tubby, originally a radio repairman, modified mixing boards and added custom-built filters and EQs. He used high-pass and low-pass filters to isolate or cut frequencies, reshaping tracks in real time.
Lee Perry, in his Black Ark Studio, used primitive but creative techniques—sometimes running sounds through broken machines—to create swirling filtered effects.
Their manipulation of filters helped shape the spacey, psychedelic sound of dub, where instruments could disappear, echo into infinity, or emerge ghost-like from the mix.
What Are Filters & How Are They Used in Dub?
Filters control which frequencies are allowed through. The most common types used in dub are:
High-Pass Filter (HPF): Removes low frequencies. Great for thinning out sounds or creating build-ups.
Low-Pass Filter (LPF): Removes high frequencies. Often used to muffle and “dub out” a sound.
Band-Pass Filter (BPF): Allows a narrow range to pass. Useful for sweeps and focused movement.
How Filters Are Used in Dub Mixing
Hi-Hats / Cymbals: Often run through a high-pass filter to leave only the shimmery highs; then echoed or delayed.
Guitars (Skanks): Filtered midrange (band-pass or low-pass) creates a “underwater” or distant feel before delay hits.
Bass: Rarely filtered in dub (except to momentarily sweep down using a low-pass for dramatic drops).
Vocals: Filtered with either high-pass or low-pass to give a telephone, eerie or spacey quality.
Ideal Frequency Ranges (Rough Guide):
Hi-hats: HPF set at 3kHz and up
Guitars: LPF/BPF sweep between 500Hz – 4kHz
Vocals: LPF sweep down to 1kHz or up to 4–5kHz
Drums: HPF snare up to 1–2kHz, LPF toms around 800Hz
Classic Dub Tracks Featuring Filter Work
King Tubby – “Dub Fi Gwan”
Listen for the way Tubby cuts the highs and mids to isolate parts of the groove.Lee Perry – “Blackboard Jungle Dub”
Uses filters to muffle vocals and instruments, making them reappear in haunting ways.Scientist – “Your Teeth In My Neck”
Filtering works hand-in-hand with delay and spring reverb to add dynamics to every element.
HOW TO GUIDES
(ABLETON, REAPER & LOGIC)
ABLETON: CREATE AND USE A DUB FILTER
Make that classic dub "woosh" or "sweep" sound using a filter and record the knob movement live.
WHAT YOU NEED:
Ableton Live
MIDI controller with at least one rotary knob
A filter plugin (Ableton’s built-in Auto Filter works perfectly)
A track with some audio playing (like a drum loop or instrument)
STEP-BY-STEP:
1. Load a Filter
On your audio or instrument track, drag in the “Auto Filter” from the Audio Effects folder.
Choose a Low Pass Filter (default setting is fine).
You’ll mainly use the Frequency knob to create the dub sweep.
2. Map Your Knob to the Filter
Press CMD+M (Mac) or CTRL+M (Windows) to enter MIDI Mapping mode.
Click the Frequency knob on Auto Filter.
Turn your hardware rotary knob.
Exit MIDI Map mode by pressing CMD+M or CTRL+M again.
Now turning your knob moves the filter.
3. Enable Automation Recording (Write Mode)
In the Arrangement View, make sure the track’s Automation Arm button (small red dot near the top) is turned on.
Also turn on the Global Automation Arm (the main red dot near the top middle of Ableton).
Arm the track for recording (record button on the track).
4. Record Your Movement
Hit the Arrangement Record button (top of screen).
While your track is playing, turn your knob to sweep the filter in real-time.
When done, hit stop.
Ableton will record all the movement of the filter as automation.
5. Tweak the Sound
Open the track’s automation lane (press A to toggle automation view).
You’ll see the Filter Frequency automation curve.
You can edit the points with your mouse if needed for more precise control.
DUB TRICKS FOR BETTER SOUND
Add Reverb + Delay after the filter for a proper dub feel.
Use Echo, Reverb, or an external plugin like Benidub, Valhalla, or PSP delays.
Try combining Auto Filter with LFO Tool or Envelope Follower for more movement.
Use the Resonance (Q) knob to make the sweep sharper and more dramatic.
WHY THIS WORKS:
Capturing live movement keeps things organic and dubby, just like the old days with mixing boards.
You can build tension, drops, and excitement with filter automation—super useful in intros, transitions, and dub sections.
OPTIONAL: Save as an Effect Rack
Once you're happy with the setup:
Group your filter, reverb, and delay (select → CMD+G)
Save it as a Dub FX Rack for quick use later.
REPEAR: CREATE AND USE A DUB FILTER
What You Need:
Reaper
A rotary knob on your MIDI controller
A filter plugin (use ReaEQ or any 3rd-party like FabFilter, etc.)
A track with audio playing
Step-by-Step in REAPER:
1. Add a Filter Plugin
Click FX on your track
Add ReaEQ
Set Band 1 to Low Pass and adjust the frequency
2. Map MIDI Knob to Filter
Click the 'Param' button → Learn...
Click the Frequency slider of the Low Pass band
Move your rotary knob — Reaper will detect it and assign
Click OK
Now your knob controls the filter frequency.
3. Enable Automation Recording
Press Alt+R or click the Record Arm on the track
Click the track's Record Mode (right-click record button) → Choose Record: Output (MIDI) or Latch Mode
Make sure automation is set to write: Go to the track envelope → Automation Mode → Write
4. Record Movement
Hit record
Move your rotary knob while the track plays
Reaper records all filter movements as automation
5. Fine-Tune the Sweep
Click the Envelope button on the track to see automation lanes
Adjust the frequency envelope curve if needed
💡 Dub FX Tip in Reaper:
Chain ReaEQ → ReaDelay → ReaVerb
Add feedback or ping-pong delays for dub effects
LOGIC PRO: CREATE AND USE A DUB FILTER
🔧 What You Need:
Logic Pro
Rotary knob controller
AutoFilter (built-in plugin)
A track with audio playing
✅ Step-by-Step in LOGIC:
1. Add AutoFilter
On your track, go to Audio FX → Filter → AutoFilter
Choose Low Pass mode
2. Map the Knob to Frequency
Move the Frequency knob in AutoFilter
Go to Logic Pro → Control Surfaces → Learn Assignment
Turn your hardware knob
Logic maps it to that parameter
Turn off Learn mode
3. Enable Automation Recording
On the track, click 'A' to show automation
From the dropdown, choose AutoFilter > Frequency
Set the track’s automation mode to Write (or Touch)
4. Record the Movement
Hit Record
Turn the knob in real-time during playback
Logic writes the movement into the automation lane
5. Edit and Refine
Use the pencil tool or grab points in the automation lane to shape the filter sweep
💡 Dub FX Tip in Logic:
After AutoFilter, add:
Delay Designer or Tape Delay
Space Designer for spring reverb emulation
🧠 WHY THIS WORKS IN ALL DAWs:
You're mimicking what dub engineers did live—only now you’re using automation + filter plugins.
The movement is expressive and makes the song feel alive.
Works great for drops, buildups, transitions, or full-on dub mix breakdowns.
🧰 Modern Tools to Achieve Dub-Style Filtering
🔌 Top Filter Plugins
Soundtoys FilterFreak Warm analog-style filtering with modulation. Great for dub sweeps. 🌐 https://www.soundtoys.com/product/filterfreak/
AudioThing Dub Filter https://www.audiothing.net/effects/dub-filter/
Comes with loads of presets but the one I start with was created by DM Khan called The Tubby Filter - a great starting point to achieve a similar result to the King
FabFilter Volcano 3 Super versatile filter plugin with complex mod routing. 🌐 https://www.fabfilter.com/products/volcano-3-filter-plug-in
AudioThing Filterjam (Free) https://www.audiothing.net/effects/filterjam/ Lo-fi multi-band filter. Great for quirky dub sounds. 🌐 https://www.audiothing.net/effects/filterjam/
Ableton Auto Filter / Logic AutoFilter / FL Filter Built-in tools with envelope & LFO control. Great for rhythm-based effects.
🎛️ Outboard Gear & Pedals for Dub Filtering
Benidub DS01 / DS71 Dub Siren + Filter Classic dub-style filter with siren built-in. 🌐 https://www.benidub.com/
Electro-Harmonix Q-Tron / Micro Q-Tron Envelope follower filter pedal – ideal for live dub manipulation. 🌐 https://www.ehx.com/products/q-tron/
Moogerfooger MF-101 (now as plugin too) Legendary analog low-pass filter with envelope control.
Boss SP-303 / SP-404 Samplers Built-in filter + FX ideal for dub manipulations.
🧪 Tips for Using Filters in Your Dub Mixes
Automation is key: Automate filter sweeps for movement and energy.
Less is more: Use filters to create contrast — cutting all highs can make a return to full spectrum hit harder.
Combine with reverb/delay: Filter before echo for clean effects or after for lo-fi echoes.
Live tweaking: Map filters to knobs or MIDI controllers for real-time dub mixing.
👑 King Tubby: Precision, Space & Surgical Filtering
King Tubby:
MCI Mixing Console: In 1972, King Tubby acquired a 12-channel MCI mixing console from Dynamic Sounds studio. This console featured a built-in high-pass filter, famously referred to as "the Big Knob," which Tubby used to create sweeping, phase-like effects that became central to his dub mixes. Gearnews.com+8Red Bull Music Academy Daily+8IRIE™ Magazine+8
Custom-Built High-Pass Filter: Tubby was renowned for his use of a parametric equalizer with a large red dial labeled “Hi Pass Filter” on his MCI mixing console. This allowed him to dramatically transform instrumental parts, a technique that became a signature of his sound.
🛠️ Gear & Filters Tubby Used
Custom MCI Mixing Console (heavily modified)
Parametric EQs and high-pass / low-pass filters
Homemade spring reverbs, tape delays, and filter circuits
Passive high-pass filter units with rotary frequency knobs
🌀 How He Used Filters
Tubby used filters like instruments, often sweeping through a sound or isolating it entirely.
Typical Uses:
Hi-Pass Filter Sweeps on Drums: Remove the lows from snares or percussion to create tension, then suddenly drop back the full frequency for impact.
Low-Pass Filter on Guitars or Keys: Muffle mid/high tones, followed by delay/reverb to create a haunting echo effect.
Isolate Sound Before FX Send: Tubby often filtered a signal before sending it to reverb or delay, giving a cleaner, ghostly FX trail.
🧠 Key Tip: Tubby often cut almost everything but the snare or hi-hat during breakdowns, using filters to draw focus. Try automating filters to isolate one sound at a time.
🔥 Lee “Scratch” Perry: Grit, Chaos & Filtered Madness
🛠️ Gear & Filters Perry Used
TEAC 4-track Tape Machine
Soundcraft & Alice mixing desks
Roland Space Echo RE-201
Homemade filters and routing (literally rewiring gear mid-session)
Modded filter boxes built by local engineers
🌪️ How He Used Filters
Perry didn’t use filters with the surgical precision of Tubby. His style was more experimental and expressive—like painting with sound.
Typical Uses:
Sweep filters on vocal fragments to make them ghostly or alien.
Overload filter circuits to create saturation and analog grit.
Band-pass filtering with reverb to emphasize certain mids and then explode them into outer space.
🧠 Key Tip: Perry would often send filtered signals back into the mixer, re-echoing and filtering the FX themselves. This feedback loop creates a psychedelic wash—try it using FX sends into return channels with filters inserted.
🔁 Real-Life Examples & Analysis
King Tubby - “Dub From the Roots” 🎧 Listen on YouTube
Isolated high-pass filtered snares
Short, snappy delay with a clean low-cut trail
Lee Perry - “Curly Locks Dub” (Junior Byles) 🎧 Listen on YouTube
Vocals filtered and drenched in space echo
Guitars scooped midrange, delayed and returned to the mix
🧪 Filter Tips for Modern Producers
🧷 Setup Your Dub Chain
Instrument → Filter Plugin (HPF/LPF) → Reverb/Delay FX → Output
Map filter cutoff to a MIDI knob for real-time tweaks.
Automate filter cutoff and resonance on key hits (like snares, guitars, or FX).
Combine with tape echo emulation (e.g., EchoBoy or RE-201 plugin).
🎧 Tips Based on Their Techniques
Start with filtering instead of adding — isolate a sound, then build around it.
Use filters before reverb/delay for a cleaner, more “Tubby-esque” dub.
Experiment with filter feedback loops like Perry did (be careful with volume).
🧰 Recommended Filter Plugins (to match their style)
Plugin
Style
Notes
Soundtoys FilterFreak
Tubby
Analog warmth, great automation options
FabFilter Volcano 3
Tubby/Perry
Very tweakable, mod routing for weird FX
Waves MetaFilter
Perry
Feedback, modulation, LFO-style chaos
Valhalla Delay (w/filter section)
Both
Excellent for filtered echoes and dub delays
Benidub Digital Filter (hardware)
Tubby-style
Modeled after analog filters, great for live
🎛️ Analog Filter Gear/Pedals (Modern Options)
Benidub DS01/DS71 – Designed specifically for dub. Great filter sweeps, hands-on knobs.
Moogerfooger MF-101 (LPF) – Legendary analog filter with envelope and resonance.
Boss SP-404 MKII – Includes LPF/HPF/BPF filters and is ideal for live dub mixing.
Electro-Harmonix Q-Tron – Funky envelope filter great for movement and dub FX.
https://billkingpiano.substack.com/subscribe?plan=paid
this is gold, thank you